For those of you who've already gotten Beta Preview or Developer Preview access to Mac OS X 10.10 Yosemite, I highly recommend installing it on a separate partition on your hard drive.
There have been many reported bugs and even blank gray screens that prevent access to the system, so if you install over your current OS, you're risking having to boot into recovery or reinstall from the ground up.
Installing the Yosemite beta on a separate partition means your 10.9 Mavericks partition will be safe and sound, and that you won't have to use Yosemite as your primary operating system. Plus, you're free to uninstall Yosemite at any time without ruining your Mavericks partition, and you can even give that Yosemite partition's space back to Mavericks if need be.
System Requirements
Apple has stated that the requirements to run Yosemite are pretty much the same as with Mavericks, so if you're currently running Mavericks, you should be set to install Yosemite, too.
It's also stated that Yosemite only needs 8 GB of available storage, but in my case, after installing Yosemite on my second partition, it reads just over 13 GB used. To play it safe, I would recommend making your second partition at least 20 GB large (I chose 50 GB).
Also, you may want to make a bootable install USB drive of Yosemite just in case you need to try again, or want to install it on another one of your computers without downloading the install file again from the Mac App Store. You don't need one, but I recommend it.
Step 1: Create a New Partition
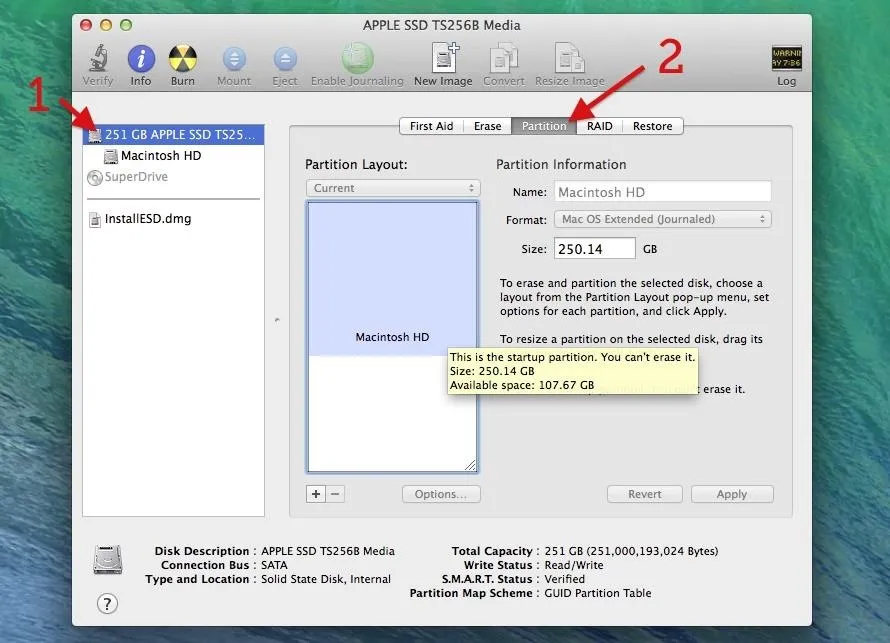
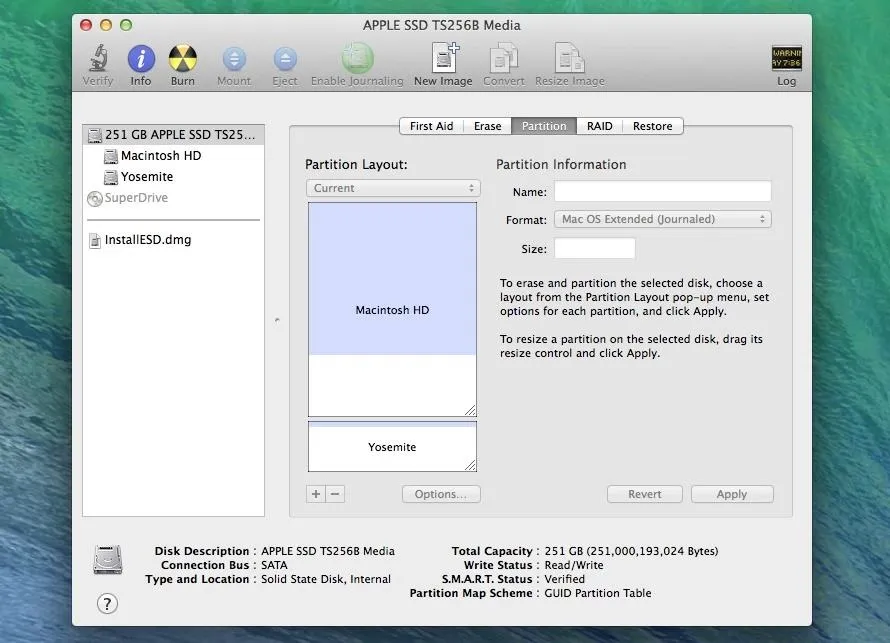
Open up Disk Utility on your Mac, and in the left section, select the hard drive that your main OS partition is installed on. Then, select the Partition tab.
Hit the plus sign (+) to add a second partition, name it Yosemite (or whatever else you want), choose the Mac OS Extended (Journaled) format, choose your size for the new partition, and hit Apply.
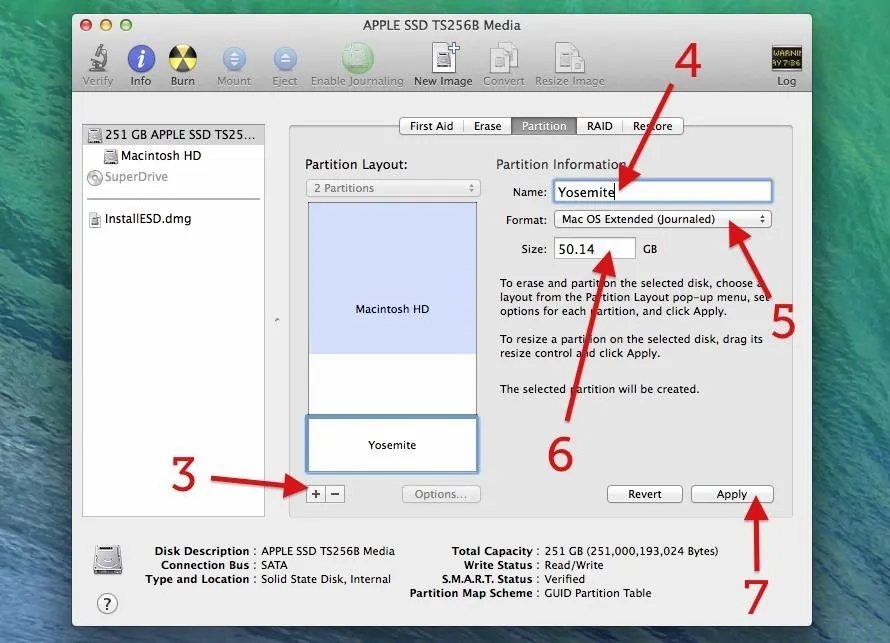
In my case, I chose about 50 GB for more Yosemite partition. Again, you can choose whatever you want, though I recommend at least 20 GB.
Next, hit the Partition button to confirm.
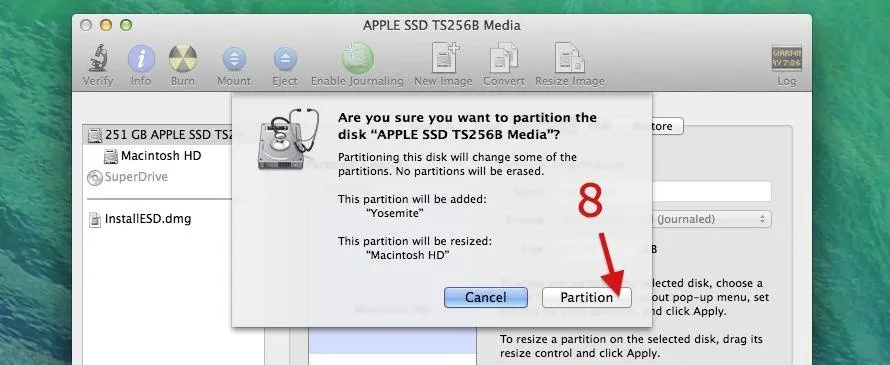
And wait. It'll go through the process of checking the catalog hierarchy, shrinking the disk, updating your recovery partition location, etc. Once it's all done, your new partition will automatically mount.
What if You Can't Create a New Partition
If you already have a second partition, either created by Disk Utility or Boot Camp, or if you're encrypting your disk with FileVault, you may not be able to create a new partition.
You can disable FileVault and delete those other partitions and try again, but you're probably better off installing your Yosemite OS on a USB hard drive (preferably USB 3.0 or Thunderbolt compatible). It won't be as fast as your internal disk, but for a beta, it should be perfectly acceptable.
If you have a really large hard drive, you can also partition it using the guide above, if you don't want to devote the whole thing to Yosemite.
Step 2: Open the Mac OS X 10.10 Installer File
If you're not using a bootable install USB drive of Yosemite, just head to your Applications folder and double-click on the Install OS X 10.10 file.
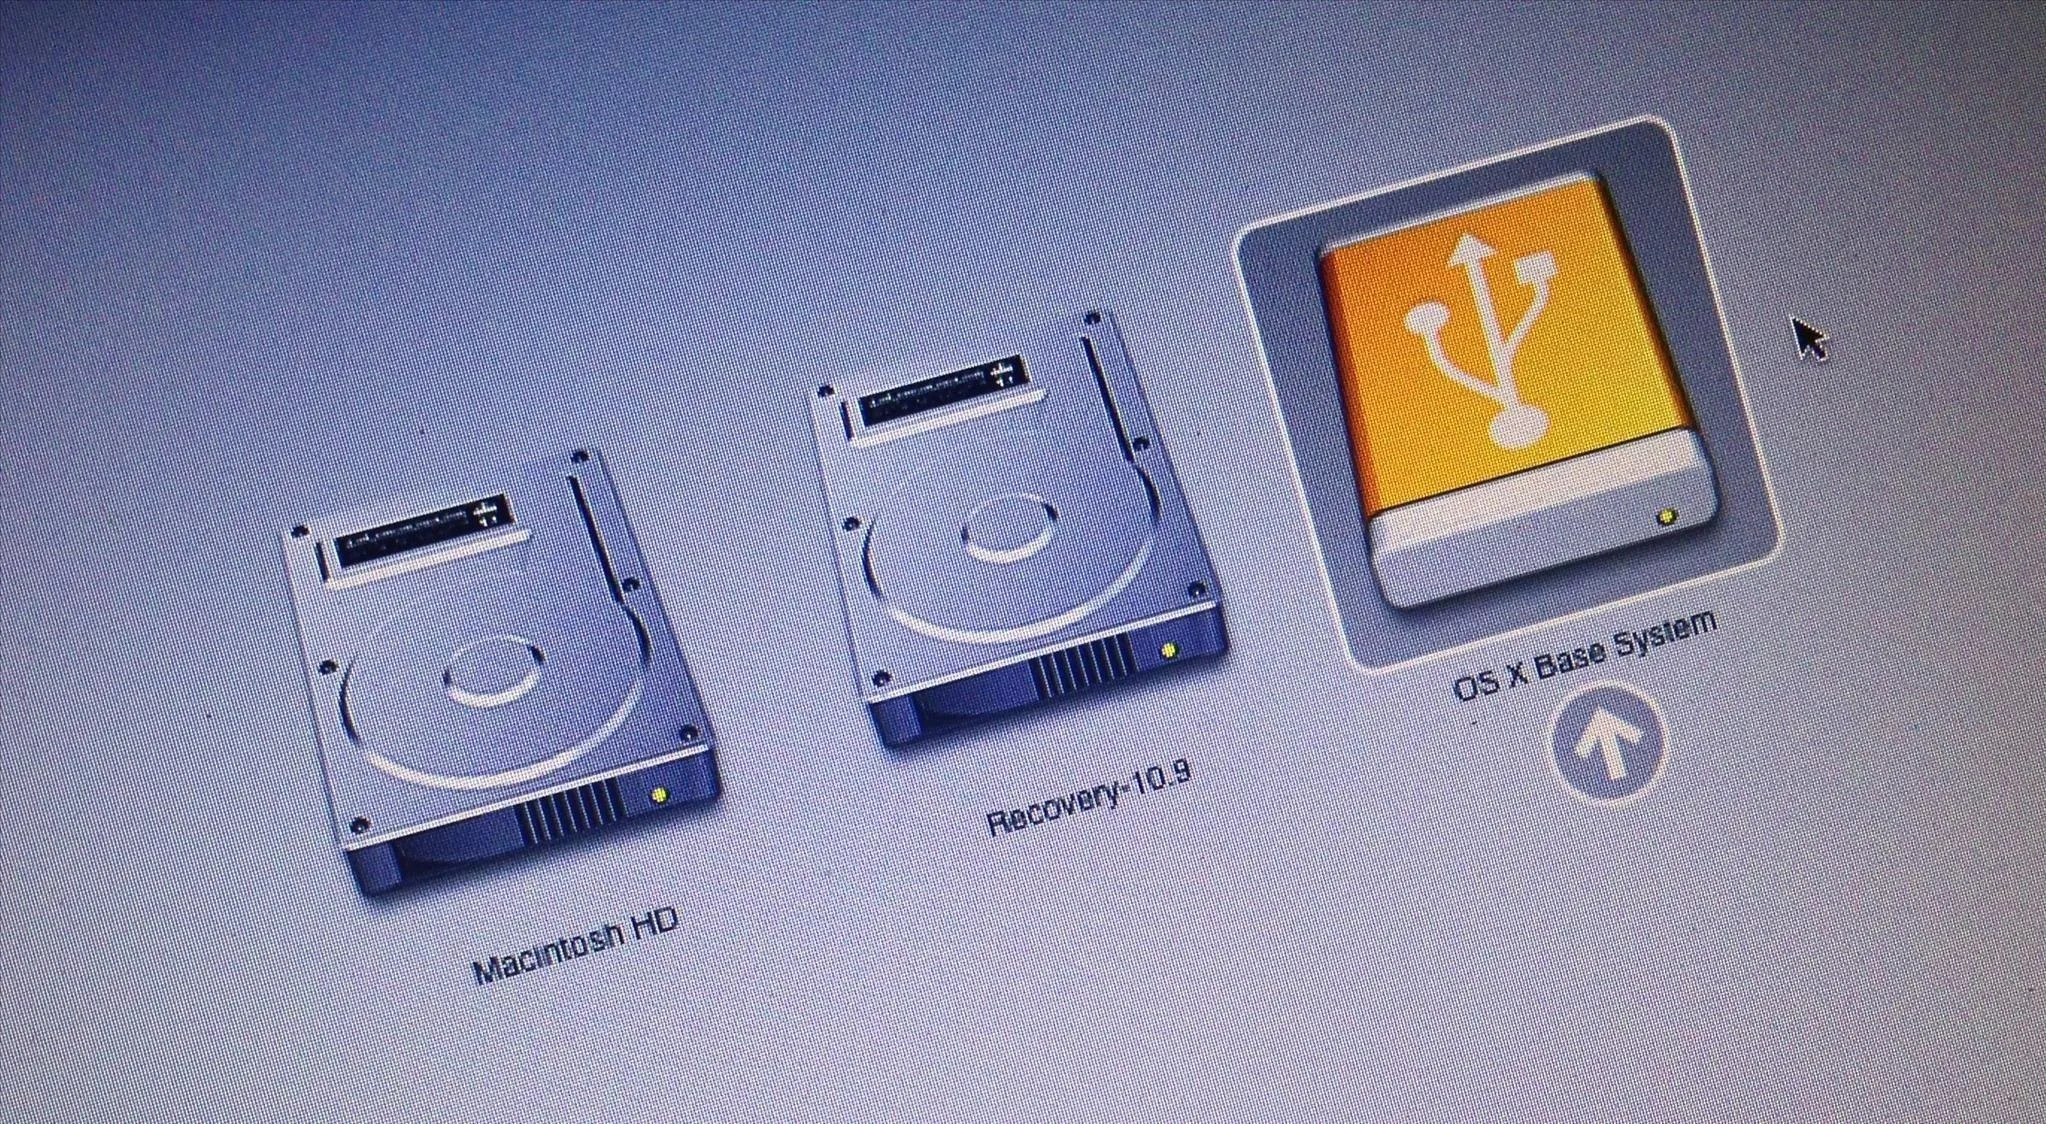
If you are using the bootable drive, restart your computer while holding the Option (Alt) key. Wait until the Startup Manager pops up, then select your new OS X Base System volume. Alternatively, you can just hold down the C button while starting up to boot directly into the USB drive.
Step 3: Install Yosemite on Your New Partition
Now all you have to do is follow the install instructions. When you come to the Install OS X screen, make sure to select the right disk, in my case, that's Yosemite.
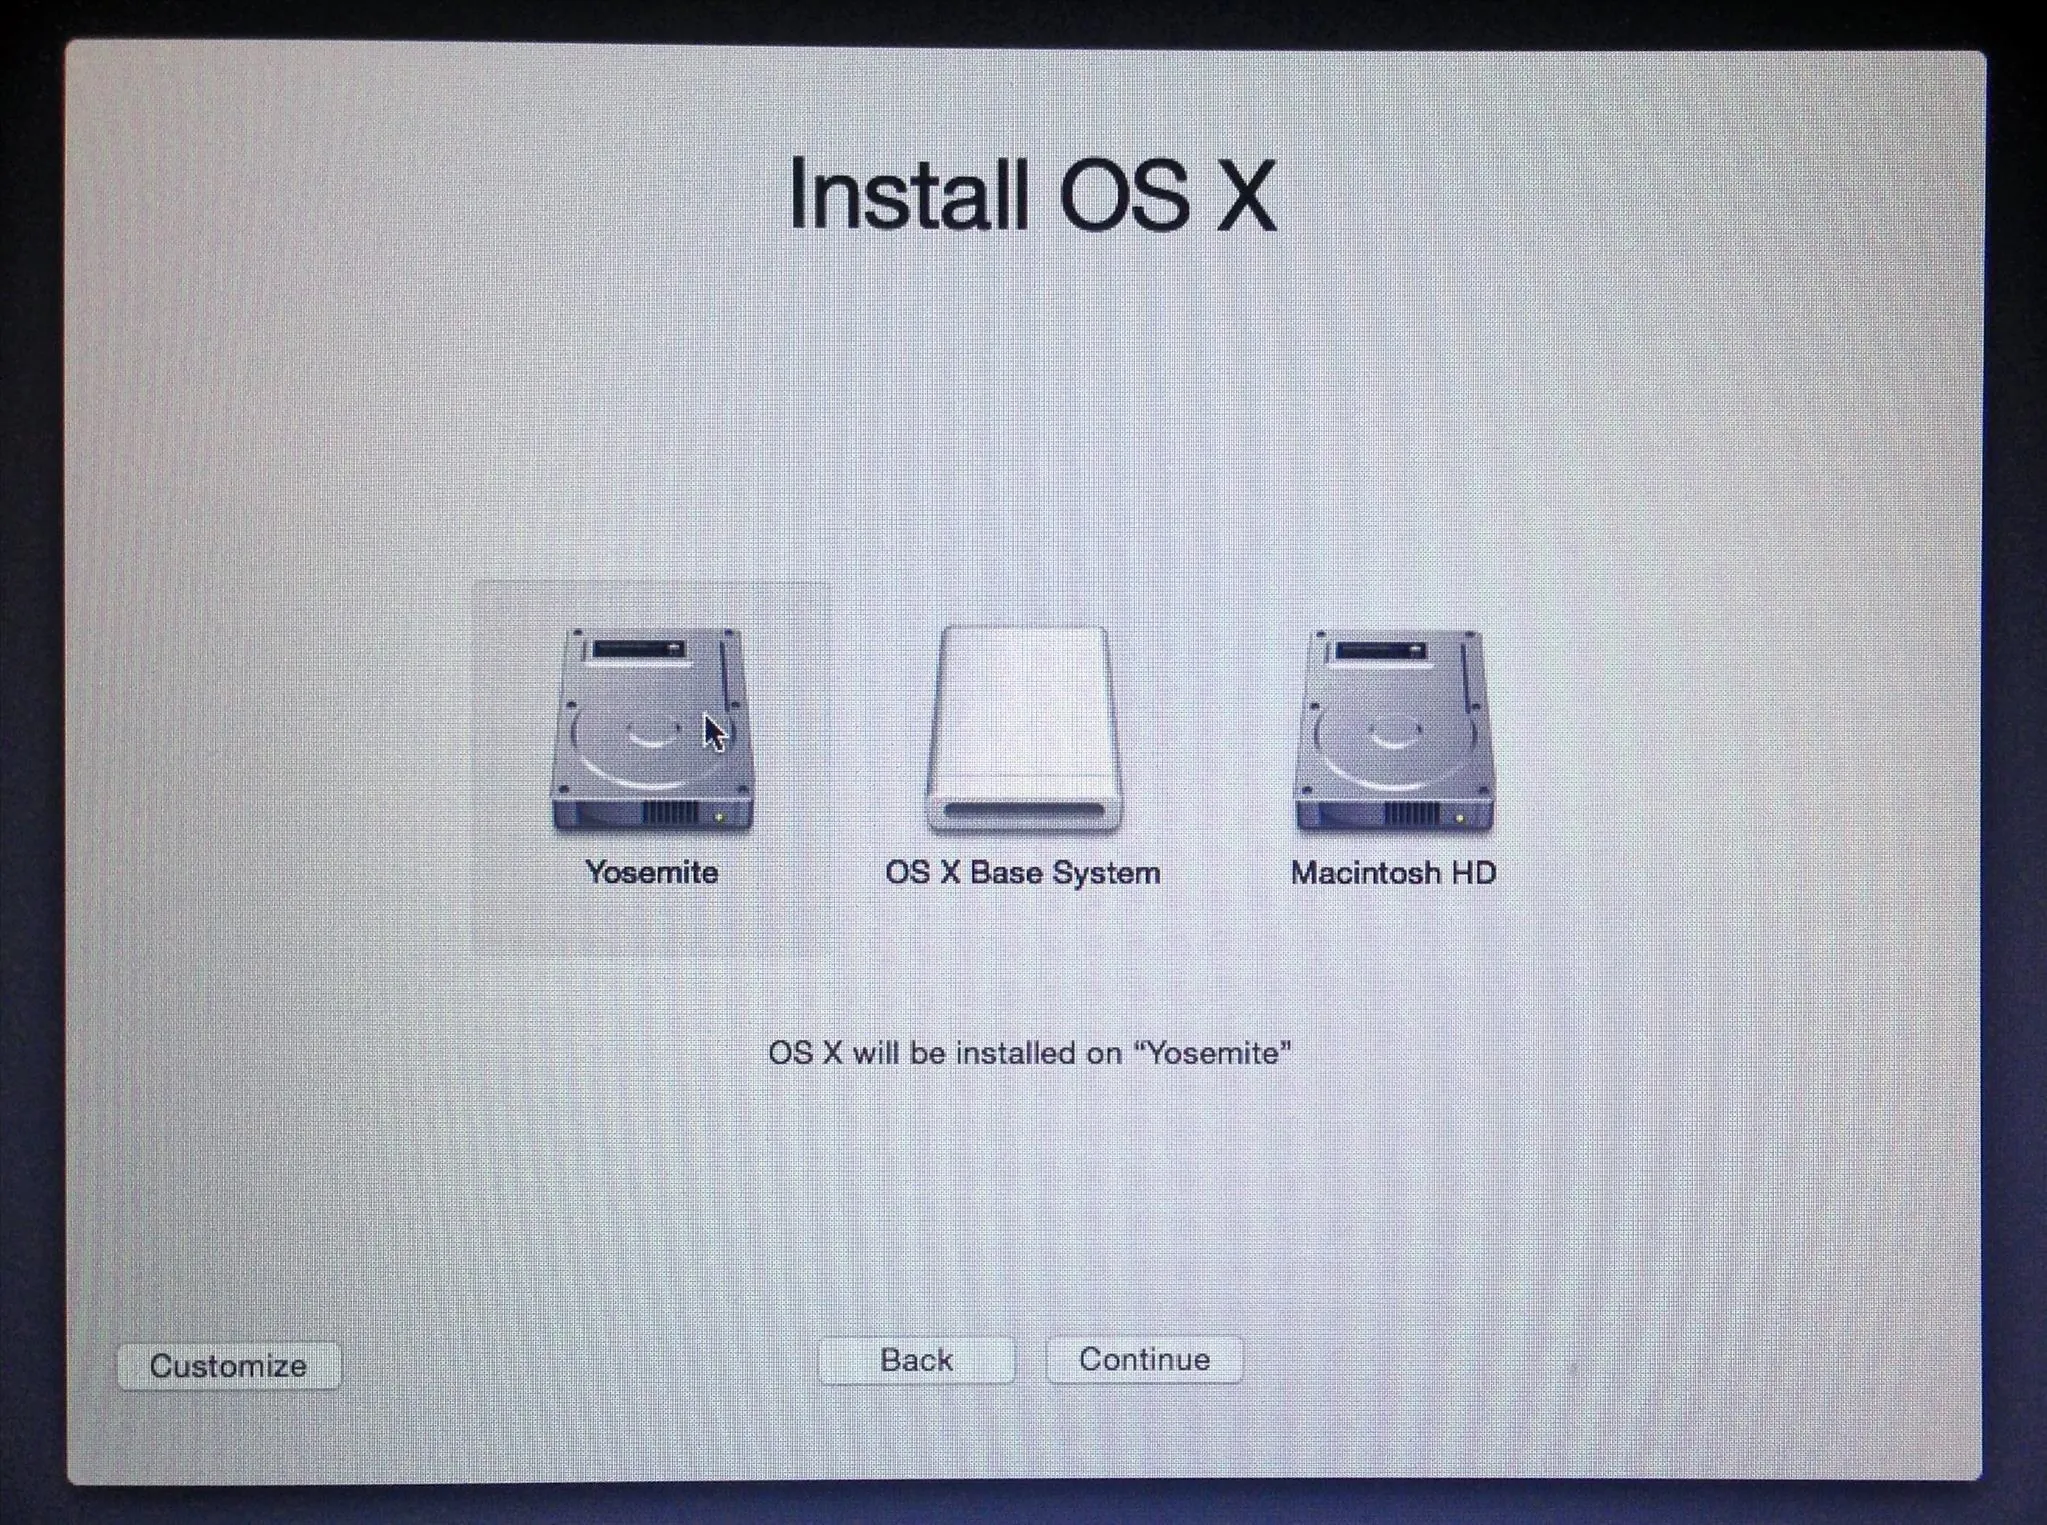
Once it's done installing, you'll get to the Welcome screen, and you should be able to figure it out from there.
I would recommend not using Migration Assistant to transfer files over from your Mavericks installation, as this will just duplicate everything. Since this is a beta build of Yosemite, I would skip it and install all of the third-party apps you want to play around with directly from Yosemite.
Whenever you want to switch from Mavericks to Yosemite, just restart while holding down the Option (Alt) key and select which one you want to boot.
If you used a bootable USB install guide and run into any issues during the installation, check out these troubleshooting tips for help.
Just updated your iPhone? You'll find new Apple Intelligence capabilities, sudoku puzzles, Camera Control enhancements, volume control limits, layered Voice Memo recordings, and other useful features. Find out what's new and changed on your iPhone with the iOS 18.2 update.
12 Comments
All well and good and thanks for tutorial but how can I also install Win7 via BootCamp and keep the dual boot status on a single HD? I can add the partition but Win 7 won't install to the new one if already partitioned to run Yosemite as a dual boot option unless there's a trick I'm not aware of. Any ideas? I MIGHT take out the DVD and install a second drive but would rather keep it as is if possible. Dev Preview 3 is great and dark them added but I hate the menu color being orange. I hope they add a setting to change that to black or something.
I believe boot camp won't work unless you have an unpartitioned drive. So, installing Windows before Yosemite is the better bet, because you can supposedly add partitions after, but not before. Also, whenever you do add a partition afterward for Yosemite, it can sometimes muck up the Windows installation, though a little messing around in Terminal can get it back into working condition.
I did this and then the Mavericks partition turned into an OSX install. It wouldn't allow me access to the Mavericks partition and simply launched the setup for Yosemite when attempting to boot from that partition.
Essentially I then had 2 Yosemite installs.
I have the exact same problem. The Mavericks partition still exists and I can still boot to the recovery partition, but I cannot seem to get rid of the OSX Install partition. I want my Mavericks back. Anybody know how?
EDIT: I'm trying a reinstall.
Did you try installing straight from inside Mavericks or from a USB install drive via the Startup Manager?
For the people having this issue. I ended up having the same problem. What I did is I changed the startup disk to my Mavericks partition and it worked fine.
I followed the procedure in this link and I was able to get back to Mavericks.
http://osxdaily.com/2014/07/31/stuck-os-x-yosemite-missing-mavericks-partition-fix/
How about installing it completely on a separate disk? How would one dual boot this setup?
I assume you mean installing it on a second internal HDD? I don't have a second internal hard disk drive, but I believe the setup would be similar to a bootable USB setup, as in, you go into Disk Utility, drag your downloaded OS X Yosemite Beta 2 (Or whatever version you have) into the side panel, go into your second hard drive and navigate to the restore tab, drag your OS X Yosemite into the source field, and then your second hard drive to the destination and click "Erase" when prompted so that the contents of the second HDD will be replaced with the contents of the OS X Yosemite... then just restart your Mac, hold down the option (alt) key when you hear the chime, and select your Mactintosh HD 2 (That's what they're normally titled, according to the Mac Pro) and you should be able to install it on the second internal HDD. I'm not sure if this is what you were asking, or if you may not understand all that I'm saying, but if you need clarification feel free to ask additional questions and I'll go more in depth about what to do. Hope I helped!
Wait, I just had a realization, install OS X Yosemite as normal, but when it prompts you to choose the installation location, choose your second internal HDD... and then select it from the boot start up menu when you hit the option key while rebooting your Mac, and it should launch right into Yosemite... I think this should do it, so you really don't need to worry about partitioning and all that, but in case I'm wrong, refer to my first attempt at explanation.
I installed YOSE... hated it. Panicked - I wanted mavericks back. Using time machine I was able to boot holding "R" down on the keyboard. This let me RESTORE to another drive. (I went external 3TB) I can then select what to boot inside SETTINGS - "START DRIVE".
Now if only I could get win7 installed. (bootcamp) it refuses to work on my machine). I've been a computer geek (PC) since 1980. Switched to Mac a couple years ago and (not going back) however I need to play some games on windows so I want to install it via bootcamp. I have ISO 64 win 7. I can run the "setup" program for windows in parallels. But after some pretty start up install screens, it can't find a drive to install to that it likes. I formatted a drive to (EXFAT?) is that same as NTFS? but no cigar. Boot camp says it can't find the install disc. Which is a external USB drive. I also get messages I can't install from USB drive. (isn't that the whole concept of bootcamp. While I love the iMac and OS X over windows. I hate Apple. In all these new updates they over look the obvious. (still not MOVE file?) I know - hold down command while dragging... but I'd like a REAL RIGHT CLICK MENU OPTION. There are to many "hidden" features. Now I see why in that old commercial they said to run a pc you need this (2ft of manuals) and to run a Mac you need this and it was a booklet of 10 pages. That's because they don't make a instruction book. You need to pick up tid-bits from others and (luckily now online). Same with the damn IOS devices. iPads - "NEW-SMALLER" mini.. iPhones - "NEW LARGER" holy crap Apple. Why not move the speaker off the bottom and aim the audio forward. Sorry for the rant, I need to vent - between the little annoying things Apple does, and this recent Yosemite fiasco, and my revisiting bootcamp after installing yose... HOPING that the new boot camp would work - I'm at the end of my rope. (what was this lesson about again?? ;-)
Can you help me? I was wondering if I can get 10.8.5 in a partition, while my macbook has El Capitan 10.11.4.
Share Your Thoughts