


MacBooks are built for creation and creativity. They're built to withstand our careers, our hobbies, and our everyday use. I use mine every day, and there's nothing I'd recommend more for computing needs.
However, not all MacBooks are built the same. The newer MacBooks models (2012 to 2014) have a logic board (aka motherboard) design that makes the fans inside the system virtually silent. While this is a great improvement, it can also have some setbacks (as with everything in life).

The system can get very hot on the bottom, which can get uncomfortable for many people. Not to say this doesn't happen with the other models, or laptops in general, but this happens naturally with the newer MacBooks.
There is a way you can control your fan's speed and power to prevent this from happening, and it's completely safe (if used properly), and easy to do. So, let's get to it.
Macs Fan Control by CrystalIDEA Software
Macs Fan Control is one of many fan controlling programs for Mac (like smcfancontrol and Fan Control 1.2), but this is one of the more stable and user-friendly applications out of the bunch.
Installing Macs Fan Control
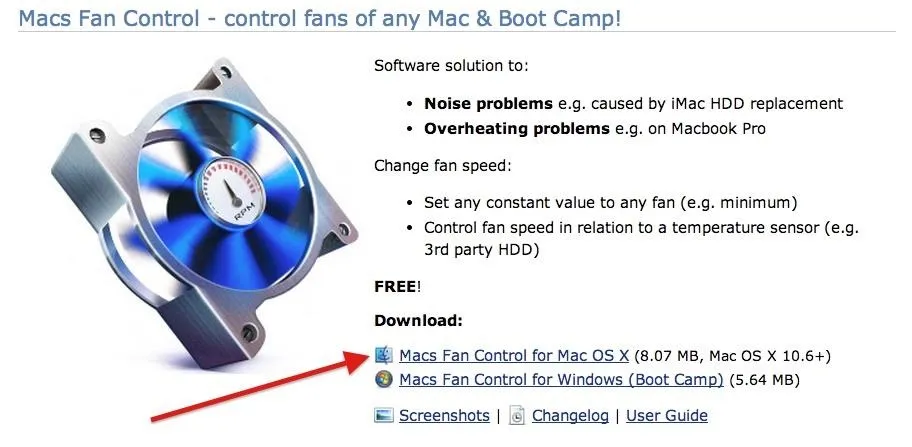
First, head to CrystalIDEA Software's website to download Macs Fan Control onto your computer. Make sure to choose the "Macs Fan Control for Mac OS X" download, not the "Boot Camp" one. Once download, unzip the file and move the app to your Applications folder.
Setting Up Your Fan Control
Double-click on the application to open it, and immediately, you'll see its icon appear simultaneously in your Mac's menu bar on the right.
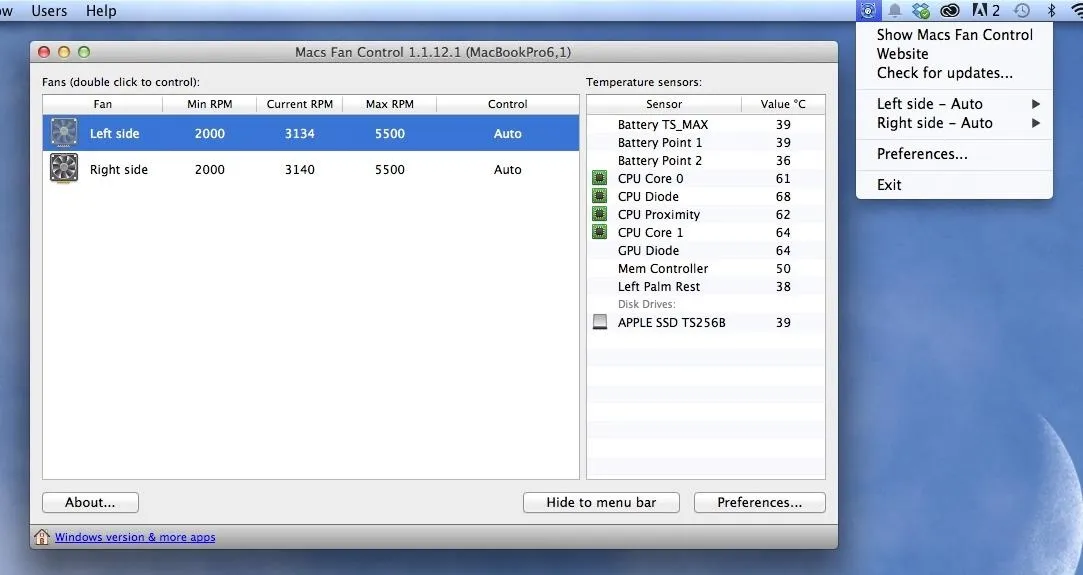
The options available in the menu bar shortcut include the following.
- Show Macs Fan Control will take you to the program, if you have it hidden in the menu bar.
- Website and Check for updates is pretty self-explanatory.
- Left/Right side - Auto will allow you to change the fan speed, which learn about later.
- Preferences shows advanced controls that we won't be needing, though you may want to change your temperature stats from Celsius to Fahrenheit here, depending on which you're used to.
- Exit will exit out of the program entirely.
Understanding the Mac Fans Control UI
This program's main window has all the information you need to understand what you're going to do, and what your limits are.
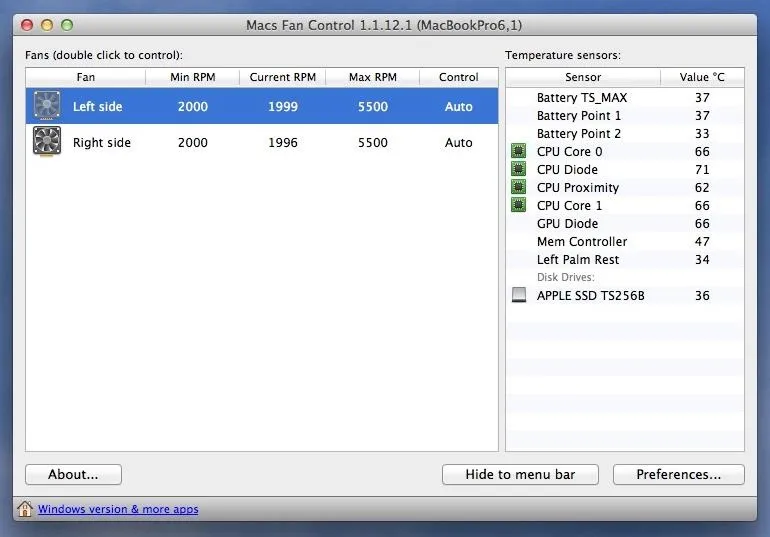
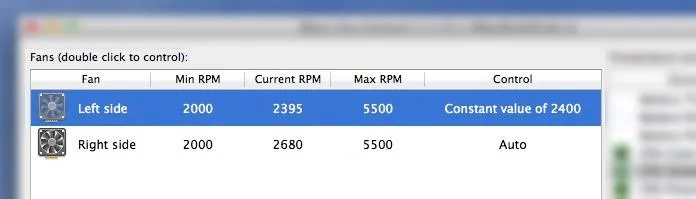
Fans Information (Left Side)
The left side of the window is your fan Information.

- Min RPM is as slow and powerless as your fan should go.
- Current RPM is the speed your fan is currently running at.
- Max RPM is the highest possible speed your fan can go. You don't ever want to go to that speed or near it.
- Control is the way that fan is being controlled. By default, it's going to be running on Auto, which means the fans have complete control of their speed at all times. This is what we can change to allow our fans to work harder and cool down our system.
Temperature Sensors (Right Side)
The right side of the window shows the temperature of all the parts of your system.

- Sensor shows the sensors in your system which are on various parts.
- Value shows the temperature of this sensor. The default scale is Celsius, though, as I mentioned before, you can change this in the app's preferences.
Just glancing at the fans and sensors information will give you a good idea of whether or not something is heating up a little too much.
Tweaking Your Fans' Speed
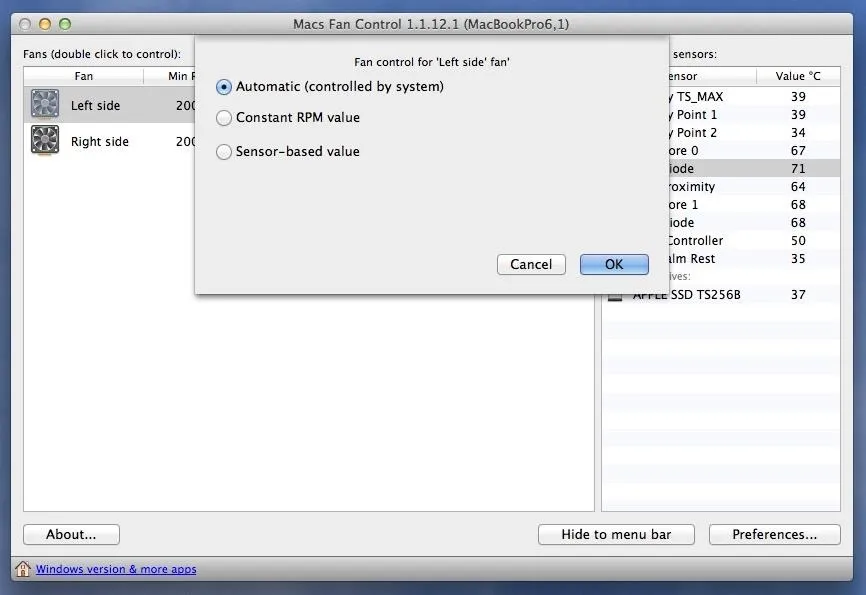
Now that we understand the information given to us, let's see how we can tweak it. Go to the left side of the window and double-click on the fan you want to affect. In this example, I'll change the left fan, but you should change both fans to the same speed when doing this procedure.
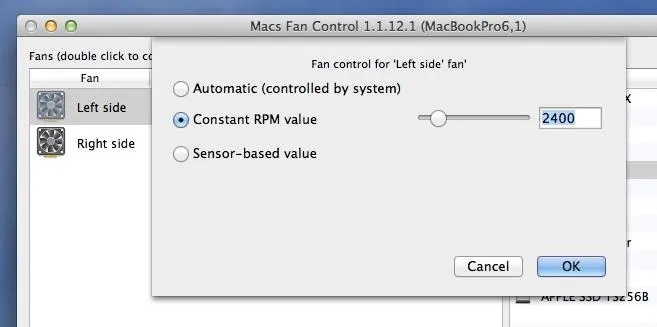
You will be presented with your options when you double-click a fan. The default is Automatic, but to change your fan's speed, you'll want to select Constant RPM value instead. You can either use the slider, or type your own custom speed.
Remember, do not go near your max RPM for the fan—pick a healthy RPM that isn't too high. Usually about 200 to 1000 RPMs above your current is as much as you should consider—I changed mine to 2400.

Once you're done selecting your speed, click on OK.
You'll see that your value will begin to increase to the value you just set. And, your Control will no longer be on Auto, it will change to the constant value you chose.
Your Mac will be begin cooling if you selected the right temperature. You will be able to hear the fan at higher rates, but it won't be doing any harm to your system. Remember to change your other fan to the same speed, so they're running evenly.
Warning: Do Not Leave Your Fans on 24/7
Do not leave your Mac running with this fan speed longer than the time you're using it. It will not cause damage for time-to-time use, but you do not want this to be a 24/7 operation. It would be best to use software like this to cool your system down while it's hot, and then reset to normal values.
Return to Original Settings
Once you've solved your heating problem, it's time to return to the original settings to prevent the fans from staying at the speed that we set. Go back to the same fan(s) you selected before, and double-click it again. This time, select the first option, Automatic (controlled by system), to go back to normal.
That's It: Enjoy a Cooler MacBook
Now you don't need to worry about your laptop burning your legs when you start to use it heavily. Did this trick cool down your laptop? Let us know in the comments, along with what settings worked best for you.
Cover image via Brett Hartt/iFixit


Comments
Be the first, drop a comment!