


By now, you've probably already installed 10.10 Yosemite, the newest version of Mac OS X, on your computer. While you most certainly noticed the visual changes, you might have missed some of the really cool additions.
We've spent the last few days getting to know it, and let me tell you, this isn't a mere redesign—there are a ton of new features packed in that make life with your computer much, much easier.
Install Yosemite, if you haven't already done so, then check out these 21 must-know tips, tricks, and features to become a master of Mac OS X 10.10.
#1. Answer & Make Phone Calls
If you have an iPhone (5 or later), you can now make and receive phone calls on your Mac computer. You just need to make sure you're on the same Wi-Fi network and are using the same iCloud account on both devices.
When you're in the Messages app, go to Preferences -> Accounts and make sure your number is checked, which it more than likely is. Now, anytime you receive a phone call, you'll get a notification at the top right of your computer screen where you can choose to accept or decline it.

To make a call, go to FaceTime and either enter the number you want to call or hit the phone icon next to a recent number under the Audio tab.

Note: In addition to Yosemite, Wi-Fi calling via iPhone also works on the iPad Air, iPad mini, and iPad mini with Retina display.
#2. Receive & Send SMS Text Messages
While you've been able to send iMessages to other iOS users directly from your computer, regular text messages were still relegated to your iPhone. Now, thanks to SMS Relay, you can send text messages directly from the Messages app on your Mac.

Just make sure to follow the instructions in Neil's iOS 8.1 guide to get started.
#3. Share Screen & Mute Notifications
Also new in the Messages app for Mac is the ability to share your screen with another person. Just click on Details in the conversation thread and choose either "Invite to share my screen" or "Ask to share screen" from the share screen option.
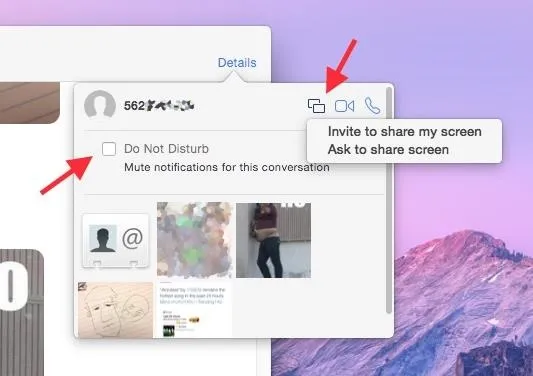
You can also mute notifications by checking the mark next to "Do Not Disturb," just like on iOS 8.
#4. Send Voice Messages
If the person you're communicating with in the Messages app has iMessage as well, you can send them voice messages, just like on iOS 8. Click on the microphone icon at the bottom right of the Messages window to begin recording.

#5. Enhanced Spotlight Search
Instead of just searching through the apps on your computer, Spotlight search now shows results from iTunes, Wikipedia, suggested websites, your emails, and more. Either click on the Spotlight icon in the top right of the menu bar, or just use the Command+Spacebar shortcut, to start a search.
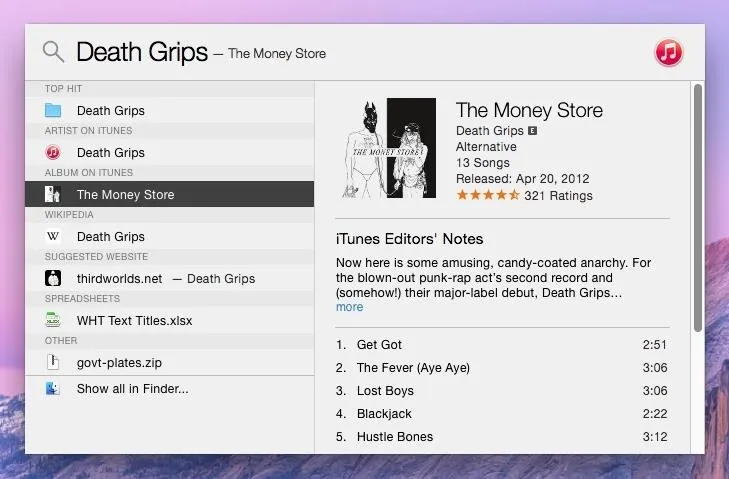
When typing in "Death Grips," an experimental hip-hop group, I was able to pull up music on my computer (and on iCloud), songs and albums available for purchase in iTunes, their official website and Wikipedia page, and even some text messages sent to friends in which the band was mentioned.
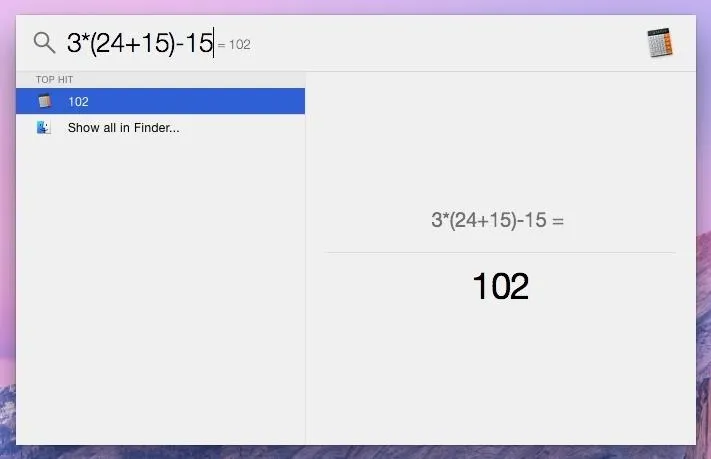
#6. Use Spotlight as a Calculator & Currency Converter
Spotlight also moonlights as a basic calculator and a currency converter. For instant calculations, use numbers and mathematical symbols in Spotlight (there's no need to hit enter or anything).
Enter the dollar sign ($) first (or any other currency symbol) and then the amount you want to convert to see the conversions for various popular currencies from around the world.

#7. Predictive Text
While it's not exactly the predictive text you're accustomed to on your iPad, iPhone, or iPod touch, Yosemite does have a hidden feature that brings up word suggestions when you're typing up a sentence.
Press Esc after typing a word and a list of suggestions will appear.

As of now, the feature only seems to be working with TextEdit (and in a few other Apple apps, like Messages, with limited functionality), but once it rolls out to other apps (hopefully Safari and Pages), it will become extremely useful.
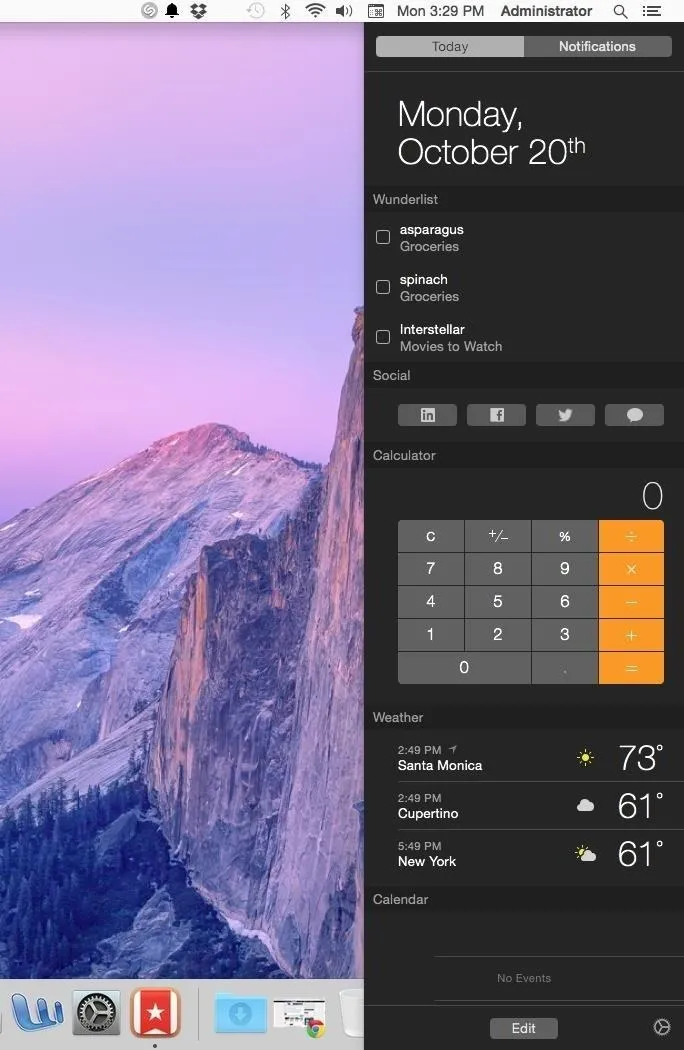
#8. Widgets in Your Notification Center
Just like on iOS 8, you can now add widgets to the Notification Center on your computer. Some of the currently compatible third-party apps include Wunderlist (pictured below), 1Password, and Pocket. Stock widgets include Weather, Stocks, Calendar, Reminders, Social, World Clock, and Calculator.
My current NC with Wunderlist included
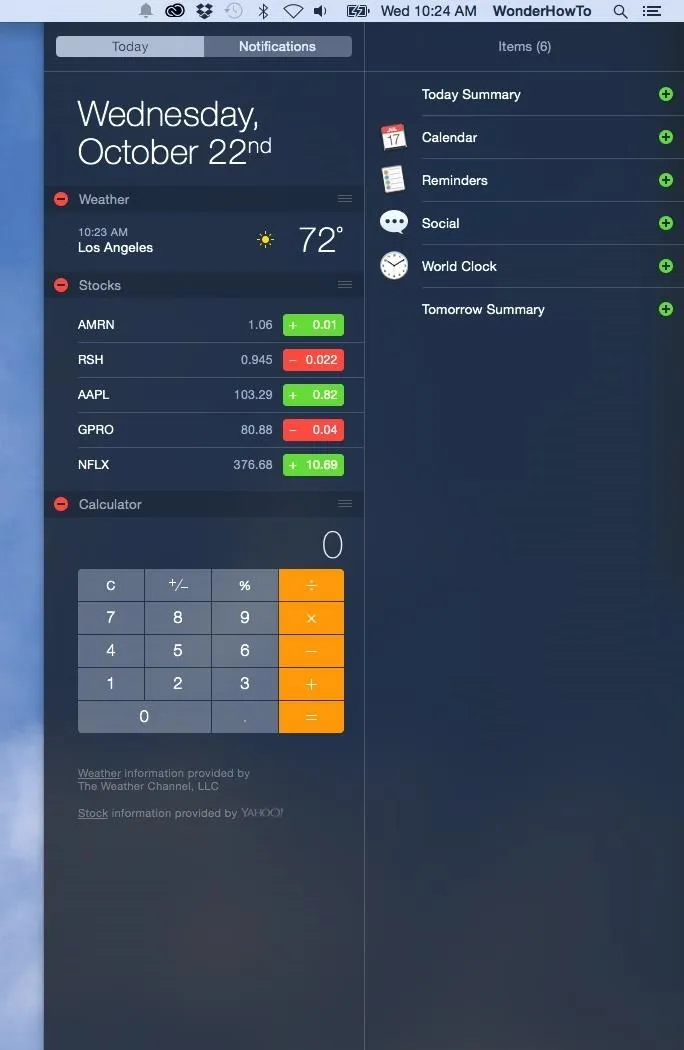
The default NC stock widgets
My current NC with Wunderlist included
The default NC stock widgets
Add a widget by opening the Notification Center (the list-looking icon in the top right of the menu bar, next to the Spotlight icon), clicking on "Edit" at the bottom, then adding each widget manually by clicking on the green plus sign (+) next to it. To remove one, use the red minus sign (-).
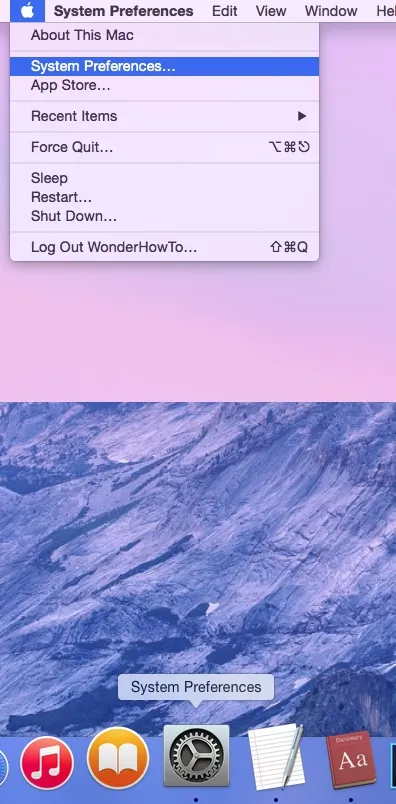
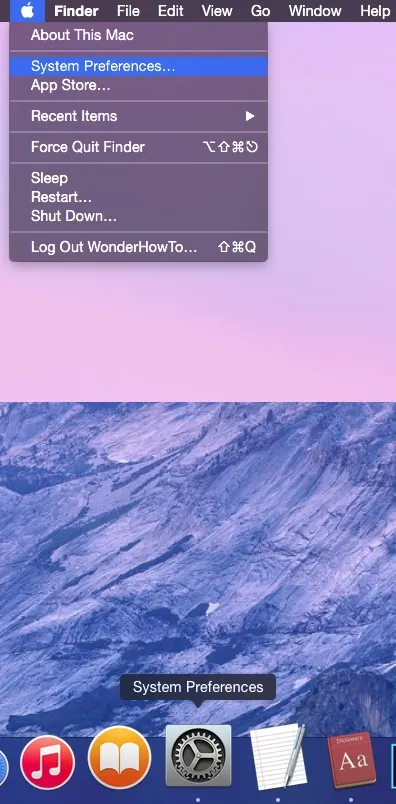
#9. Dark Menu Bar & Dock
A little easier on the eyes, Yosemite now has a dark mode that's helpful when you're using your computer at night. Head over to System Preferences -> General and check the box next to "Use dark menu bar and Dock."

Your menu bar and dock will now turn black and dark grey.
Regular mode
Dark mode
Regular mode
Dark mode
Since there's no keyboard shortcut by default for this action, Redditor abspam3 (via Lifehacker) figured out how to make one with Terminal. just open up Terminal and type in the following command, followed by the Enter key.
- sudo defaults write /Library/Preferences/.GlobalPreferences.plist _HIEnableThemeSwitchHotKey -bool true
Enter in your password, then log out and back in again, and use the keyboard shortcut Control+Option+Command+T to switch between regular and dark mode.
#10. Use Shift Key to Move Dock
Speaking of the Dock, if you want to reposition it on your screen without going into System Preferences, hover over the Dock's divider on the far right until your cursor turns into a two sided arrow. Then, hold down the Shift key and drag it where you want.
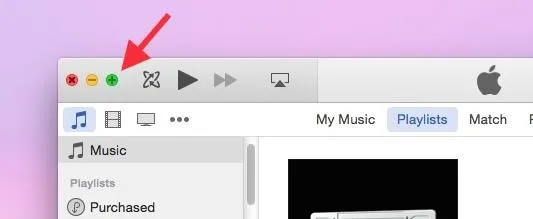
#11. Find Yosemite's Hidden Maximize Button
The full-screen button usually located in the top-right corner of an app has been replaced by the green maximize button that sits next to the close and minimize buttons on the other side of the window.
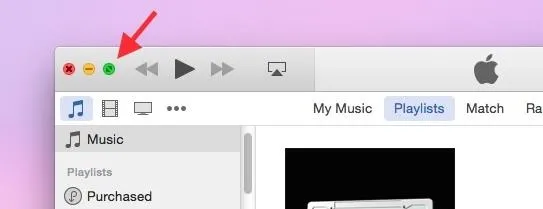
So what happened to the green maximize button? Well, it's actually still there. Hold down on the Option key and hover over the new green full-screen button; you'll see it turn into the old maximize button.
Note that if you're in iTunes and hold down the Option key, the Genius Shuffle option will appear where the back button usually is.
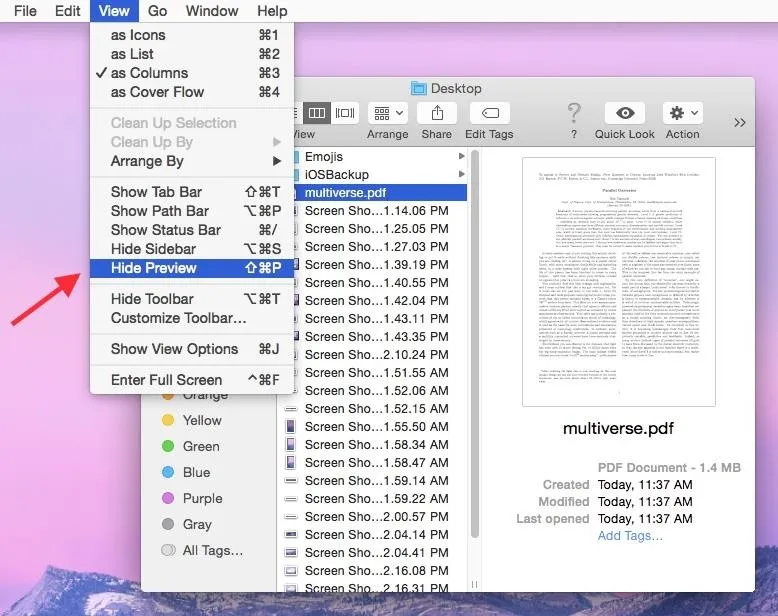
#12. Enable Finder's Preview Pane
Are your Finder windows looking a little plain? For some users, Yosemite hid some features like Preview. If you want the Preview pane back, go to View in the menu bar and click on Show Preview.
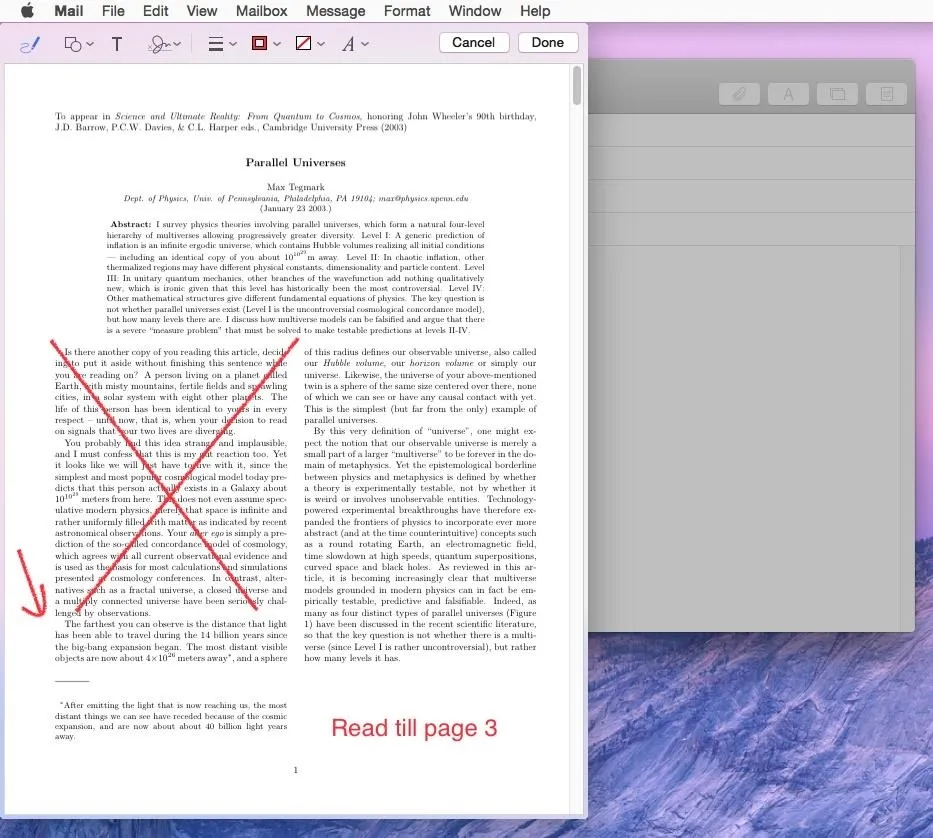
#13. Annotate Attachments in Mail
Through the Mail app on Yosemite, you can now annotate attachments such as pictures, PDFs, documents, and more. All you have to do is attach a file, click on it, then select Markup.

You can draw, add text and shapes, leave a signature, and more on your attachment, all directly through the Mail app.
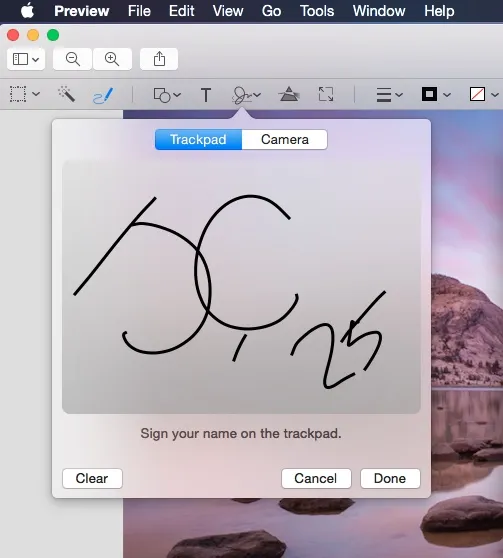
#14. Use Your TrackPad to Pen Signatures
While you've previously been able to scan signatures using the iSight camera on your Mac, Yosemite has a new feature where you can use the trackpad on your MacBook to digitally sign your signature.
Open Preview, click on Markup, and use the signature icon to begin signing with your finger. This also works through the Markup feature in Mail.
#15. Use DuckDuckGo for Private Browsing in Safari
DuckDuckGo is a web browser known for its privacy features, which allows users to surf the web without having their searches saved or their information shared with advertisers.
To set DuckDuckGo as your default search engine in Safari, select Safari in the menu bar and click on Preferences -> Search, then select DuckDuckGo under the "Search engine" option.

#16. View Stacked Tabs in Safari
Through the new "Show all tabs" icon at the top-right corner of Safari, you'll be able to view your tabs in a more organized manner. If you have several tabs open from the same website, or from Private Browsing, they will show up stacked on top of each other.

Along the bottom, you'll see any tabs you have open on your iPhone or other iOS device, which is similar to how it works on iOS devices, where your Mac tabs show up underneath iOS tabs.
#17. Close iOS Safari Tabs
As mentioned above, all of the open tabs on your iOS device will appear in Safari on your Mac. In case you want to close some of the tabs on your iPhone, you can do so directly from your computer by hovering over the tab and tapping the X on the far right.
#18. Bring Back Safari Toolbar Features
Safari has received a minimalist redesign and many of the features that you're accustomed to may not be where you remember. Follow these steps to regain some of the missing or misplaced stuff.
- Full URL: Preferences -> Advanced -> Show Full Website Address
- Bookmarks: View -> Show Favorites Bar
- Tabs: View -> Show Tab Bar
- Status Bar: View -> Show Status Bar
- Menu Bar Tools: View -> Customize Toolbar -> Drag icons you want to restore
Your Safari will go from looking like this...

To this...

#19. Record Your iOS Screen
Connect your iOS device to your computer via a Lightning cable and you can easily record its screen by opening QuickTime, going to File -> New Screen Recording, then selecting your device from the list of choices.
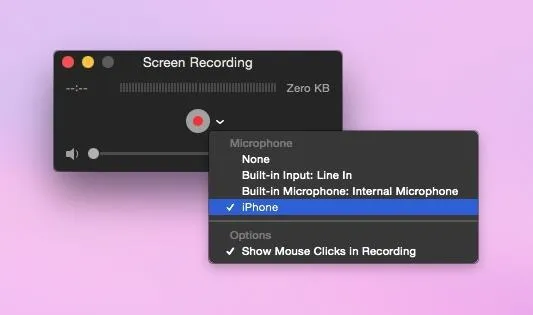
If you've used QuickTime to record your computer's screen before, it's the same process: click the red button to record and the stop button in the menu bar to finish.
#20. Take a 3D Tour of Your Favorite City
Enter a popular city name in the Maps app in Yosemite and you can take a 3D tour that flies you over the city, showing you the sites. Just tap on Start next to the "3D Flyover Tour" box that appears at the bottom. New York, Paris, Tokyo, and London are just a few of the cities that currently work with the feature.

#21. Quickly Connect to Hotspot
If your device (with cellular data) is running iOS 8.1, you can use the Personal Hotspot feature to connect it to your Mac, where you can then use it as an available network, as well as view battery life and connection strength.

Of course, you have to have a hotspot feature in the plan with your carrier in order for this to work. Click here for more info.
Final Thoughts?
Got any features to add that you enjoy on Mac OS X Yosemite? Anything you hate? Lets us know in the comments below, or hit us up on Facebook or Twitter.


Comments
Be the first, drop a comment!